Add Blog to Live Writer | 在Live Writer上新增部落格
Add Blog into Live Writer:
以下是在Windows Live Writer上新增部落格的方式:
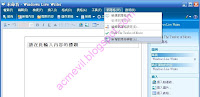
On Live Writer, select "Blog"-->"Add blog account"
在功能列上選擇"部落格"-->"新增部落格帳號"
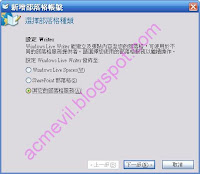
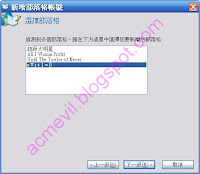
Select blog. Next!
選擇部落格種類(以Blogger為例,所以選"其它的部落格服務"),下一步
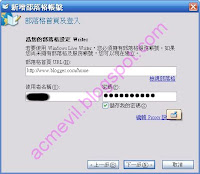
Type blog service homepage & account and password.
打上部落格首頁網址及登入的使用者帳號密碼,下一步
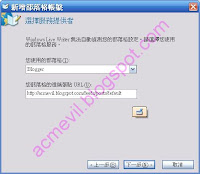
Select blog service name(ex. blogger). And the post URL can use atom or feed url.
Next!
選擇部落格服務的提供者(以Blogger為例),
部落格的遠端張貼網址URL可以貼上Blog的Atom網址或是feed網址,下一步
If your account include several blog, select one you want to add.
Next!!!
如果您的帳號含有多個部落格,在此選擇要新增的那一個。下一步
Detecting blog setting.... If there is "Allow Writer to establishment blog temporary content?"
Choose "Yes", the future use of Live Write, Writer editor will use your blog templete that the content of the article set, the same as direct online editor.
Choose "no", then use the default Writer editor appearance.
之後會偵測部落格設定,如果出現"允許Writer建立暫存內容?",可以選擇是或否。
選擇"是",未來使用Live Write的時候,編輯視窗會使用您部落格顯示文章內容的佈景主題,就像直接線上編輯一樣。
選擇"否",則使用Witer預設的編輯器外觀。

The finish info window. If you need modify the setting choose "setting". If you finish it, choose "finish".
設定完成的最後訊息視窗。需修改設定則選"編輯設定",否則選"結束"即可。

This is all. Easy! ^^
這樣就好了,很容易吧!^^
以下是在Windows Live Writer上新增部落格的方式:
On Live Writer, select "Blog"-->"Add blog account"
在功能列上選擇"部落格"-->"新增部落格帳號"

Select blog. Next!
選擇部落格種類(以Blogger為例,所以選"其它的部落格服務"),下一步

Type blog service homepage & account and password.
打上部落格首頁網址及登入的使用者帳號密碼,下一步

Select blog service name(ex. blogger). And the post URL can use atom or feed url.
Next!
選擇部落格服務的提供者(以Blogger為例),
部落格的遠端張貼網址URL可以貼上Blog的Atom網址或是feed網址,下一步

If your account include several blog, select one you want to add.
Next!!!
如果您的帳號含有多個部落格,在此選擇要新增的那一個。下一步

Detecting blog setting.... If there is "Allow Writer to establishment blog temporary content?"
Choose "Yes", the future use of Live Write, Writer editor will use your blog templete that the content of the article set, the same as direct online editor.
Choose "no", then use the default Writer editor appearance.
之後會偵測部落格設定,如果出現"允許Writer建立暫存內容?",可以選擇是或否。
選擇"是",未來使用Live Write的時候,編輯視窗會使用您部落格顯示文章內容的佈景主題,就像直接線上編輯一樣。
選擇"否",則使用Witer預設的編輯器外觀。

The finish info window. If you need modify the setting choose "setting". If you finish it, choose "finish".
設定完成的最後訊息視窗。需修改設定則選"編輯設定",否則選"結束"即可。

This is all. Easy! ^^
這樣就好了,很容易吧!^^


Post a Comment